
Connect Oracle database on Eclipse Linux using OCCI
To develop database application that use Oracle. Of course with Oracle database installed, programer must prepaire two packages provided by Oracle. One use to provide share library (*.so files) for application to run under Linux, another one is provide class header (*.h files) that programer can include in their application. We could download that two packages at http://www.oracle.com/technetwork/database/features/instant-client/index-097480.html, it’s called Instant Client.
I’m using CentOS 6.2 64 bit, so I will download Instant Client for Linux x86-64, there any many packages, however, only two package we need:
- Instant Client Package – Basic: All files required to run OCI, OCCI, and JDBC-OCI applications.
- *Instant Client Package – Basic Lite: Smaller version of the Basic, with only English error messages and Unicode, ASCII, and Western European character set support.
- *Instant Client Package – SDK: Additional header files and an example makefile for developing Oracle applications with Instant Client.
The first and second is the same, Basic Lite is smaller than Basic with fewer language support. Everyone need to choose between one of them. In my opinion, I install the first and the last packages.
- Instant Client Package – Basic for Linux 64 bit provide share library at /usr/lib/oracle/11.2/client64/lib, this is required libraries to run OCCI program.
- Instance Client Package – SDK for Linux 64 bit provide additional header files at /usr/include/oracle/11.2/client64, this is c++ header files that we need to include in our program.
Next step, we must tell Eclipse the path to the share libraries and the header files by: on Eclipse top menu, go to Project/Properties/C++ General/Path and Symbols
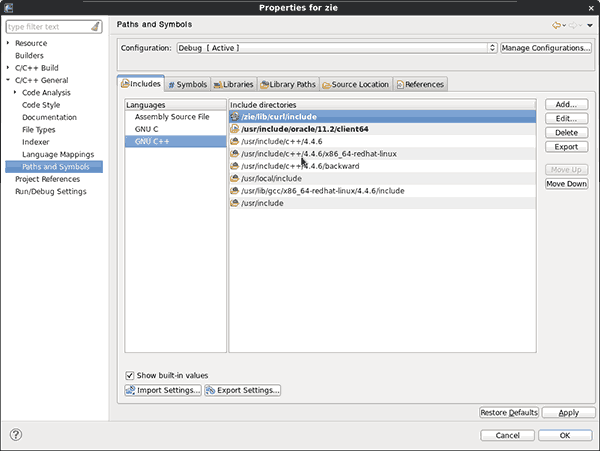
Eclipse Path and Symbols properties.
To-do list:
- Add header files directory into Include tab.
(Add /usr/include/oracle/11.2/client64 into GNU C++) - Add libraries directory into Library Path tab.
(Add /usr/lib/oracle/11.2/client64/lib) - Tell Eclipse which library that you want to link with your application by add needed libraries name into Libraries tab.
In my situation, I need to add nnz11 (libnnz11.so in libraries directory), clntsh (libclntsh.so), occi (libocci.so).

Required OCCI libraries
We need only occi library but nnz11 and clntsh is required by occi, so we need to add them first. If not, Console may be throw an error the same as:
-
Invoking: GCC C++ Linker
-
g++ -L”/media/Data/workspace/zie/lib/curl/lib” -L/usr/lib/oracle/11.2/client64/lib -o”zie” ./src/zie.o ./src/db/db.o -locci
-
/usr/lib/oracle/11.2/client64/lib/libocci.so: undefined reference to `OCISubscriptionDisable’
-
/usr/lib/oracle/11.2/client64/lib/libocci.so: undefined reference to `ldxend’
-
/usr/lib/oracle/11.2/client64/lib/libocci.so: undefined reference to `OCIPConvertRowidToUb1′
-
…
Additional, we need to set enviroment LD_LIBRARY_PATH = /usr/lib/oracle/11.2/client64/lib. It’s important to let our library know another. We can set this environment by append two line into ~/.bash_profile file (you may need to logout and relogin after changing this file):
-
LD_LIBRARY_PATH = /usr/lib/oracle/11.2/client64/lib
-
export LD_LIBRARY_PATH
Remember, libraries is require to run our application and header file is require for development. If we have already finish all steps, we can create a demo project that connect to oracle database.
-
#include
-
#include “occi.h”
-
#include
-
using namespace std;
-
using namespace oracle::occi;
-
int main() {
-
//Create new environment
-
Environment *env = Environment::createEnvironment(Environment::DEFAULT);
-
Connection *conn = NULL;
-
try {
-
string user = “username”;
-
string passwd = “password”;
-
string host = “localhost”;
-
//Create new connection
-
conn = env->createConnection(user, passwd, host);
-
}
-
catch(SQLException &e) {
-
cout << e.getMessage();
-
}
-
try {
-
Statement *stmt = conn->createStatement(“SELECT * FROM my_table”);
-
stmt->setPrefetchRowCount(32);
-
ResultSet *rs = stmt->executeQuery();
-
while(rs->next()) {
-
cout << rs->getString(2) << endl;
-
}
-
}
-
catch(SQLException &e) {
-
}
-
return 0;
-
}
If build successfully, we can sure that adding libraries and header step are ok. This demo project will execute query “SELECT * FROOM my_table”.
Hope that help!
By
You are reading a post from a man who have passionate interest in information technology :). Details about me are here https://linkedin.com/in/truonghua/ and I'm willing to connect with passionate and motivated people.